Thursday, December 17, 2009

Delightful Diva Day: Coconut Fruit Salad and Chips

I bet you are wondering why in the world you would serve chips with Coconut fruit Salad. Oh ye of little faith. I must introduce you to something fabulash. Would you come along?
Hungry Girl's Coconut Fruit Salad
(Also, my favorite combination of all things good for me!)
Items Needed:
For Salad:
2 cups of halved strawberries
1 cup bluberries
1 cup red grapes
1 cup chopped peaches
2 large bananas, slices
1 large granny smith apple, chopped
For Glaze:
6 ounces fat-free vanilla yogurt
1/4 cup light coconut milk (I found it at Giant)
2 tablespoons of Splenda sweeter (or sugar hehe)
1/4 teaspoon coconut extract
1/4 teaspoon lime juice
Directions:
1.In large mixing bowl, combine fruit.
2. In another bowl, combine all glaze items, toss over fruit salad.
3. Refrigerate unti you are ready to FEAST!


Cinnamon Sugar Chips:

Items Needed:

Flour Tortillas

Melted Butter

Cinamon and Sugar (Mixed to your liking)

1. Preheat oven to 350*, brush melted butter onto tortillas, cut into desired shapes with cookie cutters (or cut into wedges). Sprinkle with cinnamon sugar. Bake until golden brown and crispy!

These go so perfectly with fruit salad it's not even funny. Really, I'm not laughing!

Wednesday, December 16, 2009

Delightful Diva Day: Scones and Spritzer

Diva Day. Pretty Self-Explanatory. A few divas get together and have brunch, prepared by me, of course! My family and I pretty much invented it, and it stuck! Now, you to can have Diva Day prepared for you per your request. I'm anxious and waiting, and have many a new recipe to try. This particular diva day mission? The women's ministry of Susquehanna Valley Bible Church. Must I say, it was a dashing success.


Just for your sake, I will attempt to split up the courses to avoid overwhelming you. This way, you have in between posts to stop salivating because you are so jealous that YOU yourself did not partake in this diva day. It is quite alright though, all's you have to do it ask ;)
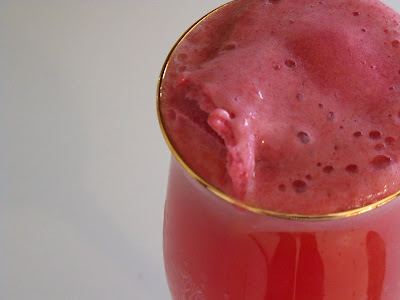

Drink. Rasp-orangemist spritzer.
Items Needed:

One carton of 50* Tropicana Orange Juice
Two liter bottle of diet sierra Mist
One bottle of Ocean Spray, Cranberrylight juice
One pint of Haagendaz Rasperry sorbet

1. Add the orange juice, sierra mist, and cranberry juice into a large and pretty punch bowl.
2. Pout into beautiful Christmas glasses.
3. Top with a scoop of the raspberry sorbet. Oh my gosh! That's all I have to say!


Bread: Cranberry Gingerbread Scones with Maple Glaze
This was my first take at scones, and let me just tell you; there will be many more to come!
:)
Items Needed:
Scone Dough:
1 3/4 cup all-purpose flour
3/4 cup old fashioned oats (not quick or instant)
1/3 cup light brown sugar
2 teaspoons of ground ginger
1 1/2 teaspoons of ground cinnamon
1/8 teaspoon ground cloves
1/4 teaspoon salt
2 teaspoons baking powder
1/2 teaspoon baking soda
1/2 cup of butter (cut into small cubes)
Lemon zest of one lemon
1/3 cup of craisans
1/2 butter milk
2 1/2 tablespoons of molasses
:)
:)
1. Preheat oven to 400*. Place rack in the middle of the oven. Line a cookie sheet with parchment paper.
2. In large bowl, combine flour, oats, sugar, spices, baking powder, baking soda, and salt. Cut in the butter with a pastry blender (or a couple of knives-improvise, improvise!!) Do this until coarse crumbs form. Stir in lemon zest and craisans.
3.In another bowl, stir together buttermilk, molasses, and vanilla. Then add to the flour mixture. DO NOT OVERMIX! Just mix until combined.
4. The dough will be a bit sticky, but remove from bowl and coat in flour. Knead the dough a few times until properly formed. Pat the dough into a 7-8 inch circle. Cut the circle in half, and cut each of the halves into three. Six scones total. (I actually made 12 mini ones, but be my guest!)
5. Transfer scones to the parchment lined baking sheet. Make an egg wash with one egg and one tablespoon of milk and brush the tops of the scones. Top with some of the oats.
6. Place a baking sheet under the baking sheet with the scones, this will prevent the bottoms of the scones from burning. Place in the oven and bake for apporximately 18 minutes or until golden brown. Let cool on wire racks.
7. Once cool, make the maple glaze and drizzle over the scones. (Maple glaze recipe to follow)
:)
Maple Glaze
Items Needed:
1/2 cup powdered sugar
1 1/2 tablespoons pure maple syrup ( I used Aunt Jemimah's butter light haha)
1-2 tablespoons cream or milk
1. Combines all above ingredients until the consistency you wish.
2. Coat all sorts of delish baked goods in this creamy maplely liquid.


Diva Chocolate (Need I say More)

I'm pretty sure that it is unecessary to explain the correlation between Divas and chocolate. Well, let me put it into a simple equation for you. Chocolate+Divas=Happy Divas. Also let me share an alternate equation with you. Diva's+no chocolate= you don't want me to go there. It's not pretty. So you can thank me for giving the divas of the world chocolate. I thought it would be the perfect favor, and, must I say, it was!

My Christmas Pretzel Bites! Oh so delightful.
1.Prehead oven to 350*
2. Place "Holiday Pretzels" from Rold Gold on a cookie sheet. Place on hershey kiss (any variety) on top of each pretzel.
3. Place in oven until just beginning to melt.
4. Take out of the oven and immediately put an mnm (or to mix things up place a Reeses pieces on there, that'll really take them for a spin!)
5. Let set, and gobble down approximately 23 at one time, I'm pretty sure that's one serving haha!

Chocolate covered oreos. Need I say more? It's super easy to. Just melt some chocolate melting wafers, dip, scrape, and repeat. Cover with sprinkles and enjoy!! Also, in the back you can see some oreo clusters. This comes from me getting so frustrated with those stinking broken oreos in the package that i felt it necessary to break them all into little pieces and throw them into chocolate because I was disgraced with them. No longer will I be disgraced with these tiny broken morsels of delight. For I greated these "oreo clusters" Equally as delicious!
A picture of my chocolate covered oreos drenched in the white melty stuff. Equally as satisfying!

Ok, please brace yourself. This might be the best chocolate covered story ever.
Choco-Peanut Butter Ritz
Items Needed:
Ritz Crackers
Creamy Peanut Butter
Melting Chocolate
1. Take two ritz crackers and spread with peanut butter.
2. Cover in chocolate, decorate with sprinkles
Holy Peanut butter crap, thats all I have to say.

Yummy, Yummy Yummy. Oh, but don't worry; I made an extra box for me-hehe! Also, as you can see, I chocolate covered some marshmallows and some kraft caramels (both found in the grocery story.) I also purchased some snowflake chocolate molds and package molds. I melted some green and red melting wafers, and voolah! Now it's your turn, go ahead. What are you waiting for?

All ready to go! Oh how my ladies loved them. I heard rumors that some were attempting to hide these delicate morsels from their children. How sneaky! I love it!

CCPS #3 Fun-Fun Fetti

Funfetti cookies are probably the most requested cookie I make. Yes, i am about to share the recipe with you. This is a very important moment, I hope all cherish it. The recipe is quite intense, time consuming, and tedious. I would give yourself a good 4 1/2 hours to make a mere two dozen of these bad boys.
While I would like to think that they are so good they deserve that much time, they really are the most simple cookie recipe I've ever beheld. So....here it goes.


Fabulous Funfetti Cookies
Items Needed:
One Funfetti Cake Mix
1/3 cup of vegetable oil
2 eggs
1. Yes that is all, only three ingredients! Preheat that oven of yours to 375'
2. Combine, with a wooden spoon!!, all ingredients until combines and dough forms.
3. Roll into balls (bigger or smaller whichever you prefer)
4. Bake for aprroximately 10-12 minutes. (They will look underdone when finished-TAKE THEM OUT ANYWAY! YOU WILL THANK ME LATER!)
5. Let Cool, and enjoy the daylights out of them.


I bet you are wondering, "what are those cute little morsels of heaven"? Well, my friend, I took the same cookie dough, rolled them into little balls, and placed them into a greased mini muffin pan. After done baking, I dug a little hole into the tarts with my thumb to let room for some VANILLA ICING I piped in. The tarts are finished off with a cute little maching green sprinkle dot!


CCPS #2 Cute Cut-outs


Cut-outs. Something that I knew needed to be mastered. I must say, it took some time. But, now that I have a loving relationship with my Kitchen-aid and I know that your are not supposed to soften butter in the microwave, I can move foward in my life.


Cream Cheese Cut-outs

sounded delighftul (that they are) make sure to add a bunch of sprinkles and icing, this cookie is designed to be topped!


Items Needed:


8 oz. Cream Cheese
3/4 cup of butter (softened-not in the microwave!!)
One cup of granulated sugar
2 teaspoons vanilla
2 1/4 cup of flour
1/2 tsp. baking soda


1. Preheat oven to 350*

2. In large bowl cream together butter, cream cheese, and sugar. Add vanilla.
3. Slowly add the flour and baking soda mixture to the we ingredients.

4. Remove from mixer and coat in flour. Knead dough 5 or 6 times. Put in the freezer for about 30 minutes. The dough is veeeerry sticky and is best rolled 5 minutes after being frozen. Trust me!

5. Bake cookies until light golden edges are seen on the cookies, about 10-12 minutes.

6. Make into alllll sorts of shapes, sizes, and things! Cut names into them, insert holes to make ornaments, or just cover them in frosting and eat them all!


A bunch of poor little snowmen! They are so excited to be decorated! Unfortunately, many of them would be eaten before they ever saw the likes of any icing!


hehehe.....Reindeer love....isn't it precious? Creepy...but precious!


These two cookies are my pride and joy. My mother bought me a little kit from Williams and Sonoma called the Name in a cookie set! It has to be the coolest thing ever. It's so good that I have the best mom in the world to spoil me with baking treasures. Oh how I can't wait to personalize cookies for everyone! Decorating them is a blast too. Which by they way, these cookies are decorated with a Wilton Icing Tube Red and White Swirl with a fin circle tip. Both of these items can be found at Michaels or any crafty/bakingy store.

Fried Freshman Makes Cookies (CCPS #1)


I know, I have no excuse for not posting anything in the last fifteen days. But, I have an excuse. It is a solid excuse to..not a whimpey one. It's called college. Yes, it does suck. It may be the "best times of your life" if you actually had a life, haha. The sad part is how true that really is. But now that finals are completed, I feel like a new women! And Bake I SHALL!

Also, don't worry, I've been baking. Oh my I've been baking. In fact, I'm amazed at the amount I bake, by still being overwhelmed by schoolword. Hmmm...it's a mystery to me.

I will now attempt to make up for my lost ground. It is called "Christmas Cookie Practice Sessions." Commonly referred to as CCPS, this is how I deliberate what will be on my final cookie platters that are handed out to family and friends. So this is my first practice round. Conveniently, it was the birthday of a family friend, so technically I had an excuse to make these tiny morsels of joy.

I must let out a little confession. I used refrigerated cookie dough for the chocolate chip cookies, but listen it's not a big deal. Conceal the evidence, and no problem, just smile and say, "thank you, my sweat and toil paid off." You still baked them, so pat yourself on the back for not burning them.


CCPS Cookie #1 (A Lauren Original)


S'more Chocomuffin Cookies
Items Needed:
One roll of refrigerated Chocolate Chip Cookie Dough, or Preportioned (shhhhh)
Twelve Marshmallows (Cut in half horixontally)
Melting Wafers (I used milk chocolate)
Sprinkles (Don't skimp on these...or I will come after you....don't test me)

1. Preheat oven to 350'

2. Grease mini muffin pans with cooking spray.

3. Roll cookie dough into 1 1/2 inch balls and flatten slightly into muffin pan.

4. Bake for approximately 7-8 minutes.

5. Immediately place one half of a marshmallow on top, bake for 2 minutes more or until marshmallow is puffy.
6. Let cool, drizzle chocolate on top, and sprinkles. Let chocolate harden and ENJOY!


PS This is a keeper, and quick!! If you want to be Becky HomeEcky then be my guest and make homeade dough.

CCPS Cookie #2
Chocolate Stars (Or whatever the heck you want to make)

Items Needed:
Melting Wafers
Cookie Cutters
Sprinkles


1. Melt melting wafers in a ziploc bag, squishing every 20 seconds. Snip a corner of the end of the bag and fill up a cookie cutter with chocolate!

2. Place sprinkles all over onto melty part. Place something rather large and heavy on top of the cookie cutter (an option would be your younger sibling, a ham, or even a textbook-be creative)

3. Let set, pop of of the mold, and enjoy!
:)
CCPS Cookie/Treat #3
Peanut Clusters(aka Mother's Talent)
I love the story behind these, because these clusters are not mine. They are my mother's. She frantically threw them together due to the realization that she needed to take a dessert to a party and I wasn't there. What to do? So she tore open part of my Chrimstas melting chocolate stash and bought a bag of peanuts, and came up with this. As you can see in the picture above, she's pretty good at the peanut thing. And the recipe is pretty self-explanatory!
---------------------------------
Happy Christmas Cookie Baking!
Love
Miss Cupcake

Tuesday, December 1, 2009

Heart of Hearts

Yes, you've caught me; making cupcakes again! I just can't resist. I jump at the opportunity. My friend's 16th birthday was approaching quickly, and she asked me to make her some birthday treats! Cupcakes and cake balls were in order.

Cake balls are yummy little cakey treats dipped in chocolate, but I will give you the full recipe. This, is one you MUST try. You will be cake ball hooked-forever!


Red Velvet Cake Balls
one red velvet cake mix
water, oil, and eggs called for on the box
One can of Pillsbury creamy surpreme icing
Melting chocolate


1. Bake the cake as directed on the package.
2. Let cool, crumble into small pieces into a large bowl.
3. Add 1/2-3/4 of the can of icing. Depending if you rather your cake ball more cakey or with more icing
4. Form into balls. Chill.
5. Melt chocolate, dip balls into chocolate and let set until hardened
6. Enjoy!


* The great thing about this recipe is that is can be changed into a variety of different flavors by just altering the cake mix and icing. I've made chocolate, vanilla, and strawberry vanilla cake balls. You can also make spice/cream cheese, lemon/vanilla, and yellow/vanilla cake balls! Use your imagination!

* You can also add your own homeade touch just by using your favorite cake or icing recipe!


Blog Template by Delicious Design Studio