Tuesday, March 30, 2010

Double Chocolate ButterCream Cake

La la Oh la la Ro-ma oh-la-la Gaga....basically this is the ultimate sinful dessert. Everything about it is absolutely wonderful and amazing and wonderful and delightful and amazing and I don't even like chocolate but I drool over this.
First off I must tell you about this icing. It's Magnolia...turned evil. It's buttercream..turned dark side. It's Darth Vader Chocolate Buttercream. Basically, a little piece of heaven. No, better than that.
Darth Vader Chocolate Buttercream
Items Needed:
  • 3 sticks of softened butter (AHHHHHH!!!!!!!!)
  • 8-10 cups powdered sugar
  • 2 teaspoons vanilla
  • 2/3 cup milk
  • 1/2 cup cocoa powder
  1. Whip butter, vanilla, milk, cocoa powder and 4 cups of the powdered sugar together for 3-5 minutes. Make sure you whip it, and whip it good!
  2. Add each cup of powdered sugar and whip on medium for one minute each time.
  3. This will be wonderful, you will want to eat it it all. Just remember, 3 sticks of butter!!
Now for the moist and delicious cake and wonderful and lovely..ok I'll stop.
Sour Cream Chocolate Cake
Items Needed:
  • One Pillsbury Chocolate Cake Mix
  • 4 eggs
  • 1/2 cup oil
  • 1/2 cup water
  • 1 cup of sour cream
  • 1 small box instant chocolate fudge pudding (jello)
  1. Combine all ingredients and beat with electric mixer on medium for approximately 2 minutes.
  2. Scoop batter into two 9-inch pans, and in 350* oven bake for approximately 30-35 minutes or until toothpick inserted comes out almost clean.
  3. Let cool and frost with evil choco-icing. Drizzle with melted chocolate!
Oh dear, oh my, yay!


Sunday, March 28, 2010

ACDC for me!

Let me just tell you...I was so PUMPED about this cake. I've always desired to bring out my inner "rocker chick." I'm sure with lots of practice, a bottle of black hair dye, and a sparkly microphone....I'd be all over the rocker chick identity.

Until then, I figured that I would just do this cake. See, the cake was for a 16th birthday cake. Plus, it was for a girl...which made it waaaay better. I just can't even wait for you to see it! Read on, read on!

First off we started with some mini cuppycakes. I just love minis so I practically stress everyone to choose them. I mean, it's the perrrfect dessert! (Complete with silver dragee-which I must share with you something....the dragees arn't actually edible hehe...but Blake tried one and said that they tasted like sugar...so we went with it....shhh!)
A few normal sized cupcakes! How cute are they! Complete with ACDC "record" decorations. They were made out of fondant, in case you were wondering.


So, I have made a resolution. I've decided that I need to give Miss Cupcake a trademark. I've found hot pink bakery boxes online...and I'm kind of obsessed with zebras. So, the hot pink box and the zebra ribbon!! Woo, I think it's a hit!
And my lovely ACDC cake!! All decorations are made of black fondant. Which, by the way, is a PAIN in the behind to dye. Then, sanded all the cute little decorations with some silver dust (actually edible haha). Lastly wrapped a cutey petutey zebra ribbon around the edges! Love it, love it, love it. I feel "rockier" already!


Happy 16th birthday Abby! Hope you loooved your cake. PS it was creamy vanilla with Magnolia buttercream! WOO!

Sunday, March 21, 2010

Strawberry Banana Smoothie Pie (Blake's version)

Blake. Need I say more. Blake is usually the cause of all my pain, suffering, problems, heatache, but he's also the cause of all my hapiness. Such a weird combination that I can't even explain. But..I do love him.

So, here's the story. I needed to learn how to drive stick, no reason, I just needed to. So, Blake decided that he would be my teacher. (I know sounds like a bad idea). So I was doing decently well, until we reached the hill where I live. Hill+Lauren+Stick Shift= terribly bad idea.
However, Blake thought that is would be funny if he stood right behind the truck and said, "I'm a 450,000 dollar ferarri, so don't run me over." I started hyperventilating...freaked out abit. So, I tried, and failed. I ran him over.....ok no I didn't really. But he did make me wajor him two baking coupons if I stalled it more than 4 times. And well, I think that you can figure out the rest. The following dessert is Blake's ideal creation. He created it in his mind....and let me just say is was an explosion of wonderful flavors......finger-licking good.

Strawberry Banana Smoothie Pie
Items Needed:
  • Pillsbury Sugar Cookie Dough Roll
  • One 12oz. can evaporated milk (I know sounds weird...but oh so delightfully creamy)
  • One small box banana instant pudding mix (Jello brand)
  • Two large size bananas
  • 1/2 cup semi-sweet chocolate chips
  • One small box instant vanilla pudding (Jello Brand)
  • 1 3/4 cup cold milk
  • 4 oz. softened cream cheese
  • 1 cup cool whip
  • Sliced Strawberries

Directions as follows:

1. Preheat oven to 350.* Press about 3/4 of the cookie dough roll into the bottom of a pie plate coated with cooking spray. Bake until light golden brown. about 20-25 minutes. Once out of the oven, pat down cookie to form to pie plate. Let cool.

2. Combine evaporated milk and banana pudding mix. Whisk for two minutes. Pour into cooled shell.

3. Top with sliced bananas.

4. Top with chocolate chips. I used melted chocolate. (But, Mr. Boss said that he would like chocolate chips better)

5. Combine cold milk and vanilla jello packet. Whisk for two minutes. Beat in softened cream cheese. Fold in cool whip. Dollop over top of bananas and smooth.

Top with sliced strawberries. Refrigerate for two hours before serving. ENJOY!!

After a slice was taken out...yummmy!
By the way, I made this last night. The pie is already half gone. (Blake is the culprit)


Mix and Match Mini Tarts

So I bet you are probably wondering why I keep posting fruit tart recipes. Well see, because the original recipe for fruit tart is so stinking good..I thought that it was worth while to play with it a little. I think I've found some wonderful variations.

The tart recipe is ultimately the same, but just a few extra perks!! woot woot!
Mix and Match Fruit Tarts
Items Needed:
  • Pillsbury Sugar Cookie Dough (Log Form)
  • Pillsburg Chocolate Chip Cookie Dough (Log Form also)
  • Chocolate Tart Filling (recipe to follow)
  • Vanilla Tart Filling (recipe to follow)
  • Peanut butter cups
  • Caramel Sauce
  • Melting Chocolate
  • Fresh Fruit (including Strawberry, Kiwi, grapes, and raspberries)
  • Peach Fruit Preserves
  1. Take cookie doughs and press them into small tart pans (as shown above).
  2. Bake in a 350* oven for approximately 8-12 minutes (depending on the cookie dough)
  3. Let cool.
  4. Fill with chocolate or vanilla filling (recipe to follow)
  5. Top with fruit/carmel sauce and melting chocolate/peanut butter cups and melting chocolate. Or create your own special creation!
  6. If you are using fruit, melt the preserves in the microwave just until able to stir easily. (about 20-30 sec. intervals).
  7. Brush preserves onto the top of fruit for a shiny glaze!
  8. Serve immediately or refrigerate until needed.

Chocolate and Vanilla Tart Filling

  • One small package chocolate or vanilla instant pudding (jello brand)
  • 1 3/4 cup milk
  • 1/2 package of cream cheese (4 oz.)
  • 1 cup cool whip
  1. Whisk chocolate or vanilla pudding mix into the cold milk for two minutes.
  2. Let set for approximately two minutes.
  3. Beat in softened cream cheese.
  4. Fold in cool whip.

The recipe works to make both fillings.


Yummy! All of these precious little tarts.
Heres an idea. Set up a Fruit Tart DIY station. Make up a bunch of different tart shells. Set the fillings in pretty bowls, and have a few bowls of fruit, caramel, peanut butter cups, hot fudge, etc.
You'll be famous among your fruit tart friends.

Monday, March 15, 2010

Skinny Thinny Mintys and Some Extra Dough!

I'm dealing with a small obsession creating new cookies. Lots and lots of new cookies. I've found a few that are really tasty and absolutely worth tasting. I've also found a few that could be labeled as the best cookies ever eaten. These, I can't share...only pictures, which are to follow. These recipes will be shared...but hopefully in a Miss Cupcake cookbook!!! Yes, isn't that exciting!!

My First Creation was these yummy little shots of goodness. I've also been obsessed with girl scout cookies these past couple days...because it's that type of season!
Skinny Thinny Mintys
Items Needed:
  • One Pillsbury Chocolate Cake Mix (Devil's Food)
  • 1/3 cup canola oil
  • 2 eggs
  • 1 sleeve of girl scount thin mints (crushed)-you can also use the Keebler version
  • One teaspoon peppermint extract
  • Melting chocolate (green)
  1. Preheat oven to 350*
  2. Combine cake mix, oil, and eggs until combined (don't overmix).
  3. Fold in crushed cookies.
  4. Drop by large teaspoons full onto cookie sheet.
  5. Bake for 10-12 minutes. They will puff slightly when finished. Do not overbake. TAKE THEM OUT!
  6. Melt the green melting chocolate and stir in the peppermint extract.
  7. Pour into ziploc bag, snip the end, and pipe striping designs onto cooled cookies!
  8. Yum-o (in the Words of Rachel Ray)
Then, I actually had extra dought (because I only halved the above recipe just in case they turned out like crap.
So, I decided to make little chocolate peanut butter tarts! All that you have to do it use the above recipe (cake mix, eggs, and oil) and push dough into little cupcake tins. Bake about 7-8 minutes or until puffed. As soon as you take them out of the oven, shove a little pb cup into the center. Let cool, then take out of the tin! Enjoy!


These cookies were special, because without giving away too many details...they were actually for a friend in the service: hence the red, white, and blue....I was feeling quite patriotic.


Saturday, March 13, 2010

Peachy Pancakes for Blakey

Here's a story.
Lauren and Becky go to this lovely Inn for Breakfast.
Blake gets jealous.
Lauren was feeling generous.

Lauren: Blake, do you want me to make you something for breakfast, say no.
Blake: Yes
Lauren: (Sigh) FINE!

So, I'm not always nice to him...I think that has already been established. But, I was actually excited that he said yes...because I made a new creation! I love when that happens! You are going to want to get those griddles out and start flipping those hotcakes!

So I looked in the cupboard...and here's what i had: peaches, buttermilk pancake mix, and brown sugar....hmmmm......

Peachy Pancakes With Caramelized Peachy Drizzle: for Blake
Items Needed:
  • buttermilk pancake batter (I used Aunt Jemimah Complete-all that I had to do was add water!)
  • 1 small can sliced peaches in syrup
  • 1/2 cup of light brown sugar
  • dashes of cinamon
  • dashes of nutmeg
  1. Prepare the pancake batter, or use your favorite recipe for pancake batter. Make the batter for about 6-9 pancakes.
  2. Drain the peaches (reserving 1/4 cup of the juice). Chop up into small pieces. Add the juice and the peaches in a small bowl.
  3. Stir brown sugar, cinamon, and nutmeg into the peach mixture.
  4. Drop pancake batter onto a greased griddle or pan.
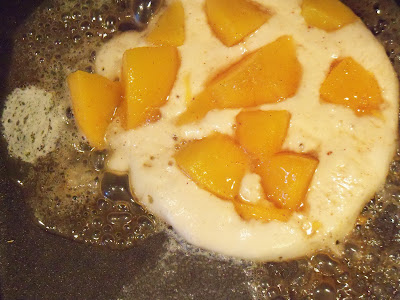
  5. Add peach mixture to the top of the pancake. (As shown above). It will sizzle like no one's business...it's lovely.
  6. Flip pancakes when underside is light brown.
  7. Pour the remaining peach mixture onto the griddle until the mixture turns a nice golden brown color. Serve over the pancakes.


Pancake before the carmelly goodness.

Pancake after the caramelly goodness....yuummmmy.


Blake loved them sooo much, he even complimented me....fyi...that RARELY happens. Usually he likes it, he just says he doesn't because he likes making me angry...it works haha.


Friday, March 12, 2010

Roooarrrr-antastic Lion Cake

So I bet you are wondering why in the world I made this cute little lion cake? Well, I'll tell you. A friend of Blake's from school saw Miss Cupcake...and voolah...I was hired! I loove when that happens. It's for a 1st birthday...lion themed! Yay!

So this cake started off as being his own "personal cake"...but it transformed into this rather large cake...so...he..can just....take his time.


Off course cute little cuppy-cakes to go along with!

And baby cakes to finish it off!


Queen For a Day Cake

Yay! Queen for a day!! We all need that once in a while! So, you know that I just loooove baking cute little packages of joy for people! I recieved this lovely opportunity to bake a "queen cake" for a lady from a lady at my church (a bit confusing I know).

Anyway...I saw this absolutely adorable cake on the internet a bit a go, and right on top there was this adorable little tiara.....made out of CHOCOLATE! Yes, it's true!! The combination of everything wonderful..chocolate, pink, and queenship. I couldn't pass this up...no not I!
So I started off with some cutie pie mini cupcakes for the "queen!"


Ok, I'll tell you how I made it now. I would love to keep my tiara tricks a secret....but isn't it better if I share them with you! Actually, I lied...I'm gonna keep it a secret...hehe
Complete with a cute little ribbon!


Wednesday, March 10, 2010

Peanut 2X Butter Finger Cookies

So, I felt like being creative today. I think it was semi-successful...but there was a problem. See, i'm stuffing 125 dozen eggs for my mother's office Easter Egg hunt. Yes, 125 dozen. It's overwhelming. But the thing is, it comes with it's perks. No, I'm not talking about my aching fingers from trying to shut each and every egg and then the eggs coming apart when I put them in the bin. I'm talking about the candy! $300 worth of candy. It's amazing. My whole kitchen table is filled with bags and bags of Easter delight. So the creative part works in when i realized that I wanted to make some kind of candy cookie. But, I had too much to choose from, it was so difficult, I'm really not good with choices. But...I managed...and here's what I decided on.
Peanut 2X Butter Finger Cookies
Items Needed:
  • 1 Yellow Cake Mix
  • 1/3 cup oil
  • 2 eggs
  • 12 mini butterfinger candy bars (chopped up)
  • 2/3 cup crunchy peanut butter

Directions

  1. Preheat oven to 350*
  2. In electric mixer, combine cake mix, oil, egg, and peanut butter until combined.
  3. Stir in butter finger pieces.
  4. Roll into balls, and place on ungreased cookie sheet.
  5. Bake 12-15 minutes. They will look under-done....TAKE THEM OUT ANYWAY! This is to ensure a shoft and delightful cookie!!
  6. Yields about 30 two inch cookies!! Yumm!!
Yum Yum!! The dough. I wish this wasn't so bad for me. Dear cookie dough, I want to eat you...right now!!


Delightful little morsels on their cooling rack!


The great part about this cookie is that you can chop up any chocolate bar, or use any cake mix! What a delightful creative cookie!!


Blog Template by Delicious Design Studio