Sunday, February 28, 2010

Peanut Butter Cup Cake: Heart Attack Version

Oh dear. Must I revel in my peanut butter joy by myself? I can hardly stand it...I thought I would share. This is the empitomy of Choco-Peanut butter combinations. Just keep reading, and I think that you will agree.
First of all, I had a little help. I employed Jared to cut multiple bags of peanut butter cups. Yes, multiple. Yes, it's only one cake. You have to realize something, this is probably the worst thing that you will ever eat in your life. However, it is soo worth it. SO worth it!

This is the bowl of peanut butter cups just for the outside of the cake...haha...yes there are actually two MORE cups inside the actual cake itself.

Next, a picture of the most delcious, sweet, and fantastic peanut butter icing ever. Oh dear, I saved about a cup just for me. And yes, I did pipe it into my mouth. And yes, I did enjoy it ever so much.

Peanut Butter Cup Cake:Heart Attack Version
For the Cake:
  • 1 Pillsbury Devil's Food Cake Mix
  • 4 eggs
  • 1/2 cup canola oil
  • 1/2 cup water
  • 1 small package instant chocolate pudding packet (jello brand)
  • 1 cup sour cream
  • 4 cups chopped mini peanut butter cups (plus 8 non chopped)
  • Fabulous Peanut Butter Icing (recipe as follows)
  • Melting Chocolate

For the Fabulous Peanut Butter Icing

  • 2 sticks softened butter
  • 6-8 cups powdered sugar
  • 1/2 cup milk
  • 2 teaspoons vanilla
  • 1/2-3/4 cup peanut butter (depending on your desired level of peanut butter-ness)

With electric mixer, combine butter, milk, vanilla and 4 cups of the powdered sugar for 3-5 minutes until very creamy with. Add one cup of powdered sugar at a time, mixing well after each addition. Finally, beat in peanut butter.

Directions:

1. Preheat the oven to 350*F.

2. Combine the cake mix, eggs, oil, water, pudding packet, and sour cream. Beat on medium speed for two minutes. It will be very thick!

3. Fold in the chopped peanut butter cups. Scoop into two greased 9-inch pans.

4. Bake for 40-45 minutes or until toothpick inserted comes out clean.

5. Invert onto flat surface. Let cool for one hour.

6. With one layer top down. Ice the top of the cake with peanut butter icing.

7. Top with second layer (top up). Ice top and sides of cake.

8. Press two cups of peanut butter cups around the sides of the cake. Use the rest on the top middle of the cake.

9. With end cut off of a ziploc bag, pipe icing around the top outside of the cake. Top the icing mounds with the uncut peanut butter cups.

10. Melt chocolate in a ziploc bag, snip end and drizzle the cake with chocolate.

11. Serve!!!! (Watch everyone melt...you WILL get compliments. People WILL think you are amazing..I'm just telling you this to be ready...prepare yourself!!)


Friday, February 26, 2010

Miss Cupcake Makeover!!


I'm so excited to share with you that Miss Cupcake just got a makeover.
She is so cute now and finally feels at home!
Soon, she will have a cute title to go along with her new cute look!


Miss Cupcake creations are sure to look EVEN better now that Miss Cupcake is FABULASH!


Thank you to Delicous Design Studio for designing this! Miss Cupcake loves you!

Thursday, February 25, 2010

Coffee Cake: Upside-Down Version

Fail. This is the word that most correctly describes my recent baking venture. Epic Fail. I've been quite obsessed with a blog called http://www.picky-palate.com/ She's a mother of two, and her cooking style is so much like mine. Fun, cute, and easy. So, as I was searching through her blog one day...I stumbled upon this. Starbuck's Coffee Cake.(retrieved by a friend of hers.) Now, I'm not sure about you...but Starbuck's baked goods are amazing! So, I figured it was worth a try.


Well, I'll start with the recipe...and we will go from there.

Coffee Cake: Upside-Down Version
Items Needed:
  • 1 yellow cake mix
  • oil, eggs, and water called for on the box
  • 2 sticks cold salted butter
  • 2 1/4 cups flour
  • 1 1/2 Tablespoons cinnamon
  • 1 1/2 Tablespoons vanilla
  • 1 3/4 cup brown sugar (slightly packed)
  • Powdered Sugar for dusting (I kind of forgot about that...oops)

Directions:

1. Preheat oven to 350. Spray 9*13 pan with cooking spray.

2. Make cake mix according to the package. Bake in oven for 15-20 minutes or until slightly set.

3. While cake is in the oven, make the "crumb topping." Combine cold butter, flour, cinnamon, vanilla, and brown sugar with electric mixer until fine and crumbly. Set aside.

4. When cake is slightly set, take out of the oven and immediately crumble the topping over top. Return to the oven and bake an additional 10-15 minutes or until topping looks more "baked."

5. Let cool, cut into small pieces, and top with powdered sugar.

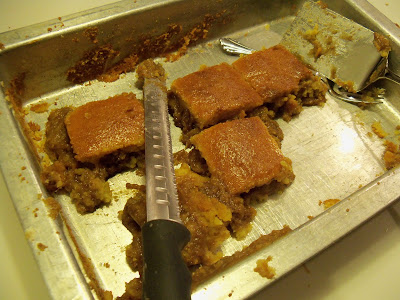
So, I did all that! Everything that recipe said...I did. But, this is what happened. Yeah, not what I thought it would look like either. The words..yellow puddle of raw-ness came to mind. So, what did I do...I threw it back into the oven for another ten minutes....and....

No, no...that didn't seem to work. It just got more brown and hard on the top...and gooey inside. Not baked, raw. So, I thought that maybe if I cut it into pieces...the heat would find it's way inside the cake and "bake" the inside. I mean...that sounded logical to me...I thought that I would give it a go.


Yeah....no....just got more brown, and after 1 hour and 20 minutes in the oven. I just gave up. Just completely gave up. So I took it out....and waited. I thought about what would be the best way to get rid of this concoction before any one knew that I had produced something that wasn't really up to par with Miss Cupcake. But, no. Mother walked in...and she saw it. She saw that ugly mass of crunchy and raw. So willingly she said that she would try it.....I didn't think that this would end well.

So, I tried to cut it. Nope. Didn't work. Except that I realized the outside edges were actually baked and the inside pieces were just messes of cooked filling. See, I realized what happened. Number one. I didn't bake the initial cake long enough. So when i put the topping on....the cake overtook the topping and sunk to the bottom. Quite a sad story actually......but....would'nt you know...those side pieces were semi-decent looking.

So, mom tried a sample...and her eyes rolled back into the side of her head. I was just about to call the hospital...when I realized that her eyes were eyes of coffee cake pleasure. She said it was wonderful. I looked at her and kind of gave her the "are you kidding me" look. I tried it. Then, i tried some more just to make sure. Then another little bit, and I realized that my disaster was an amazing new novelty in all things coffee cake....BEHOLD, the upside down cofee cake.
I think that this was my ONLY piece that kind of resembled coffee cake. Why don't you head on over to pick palate and see what it was actually supposed to like.

Monday, February 22, 2010

Cake Bake for Blake

Number two on the list of Blake's so desired desserts. This was his actual "birthday cake." Chocolate detail included!
Blake Forest Cake for Blake
Items Needed:
  • One Pillsbury Devil's Food Cake Mix
  • Oil, water, and eggs called for on package
  • 1 pint heavy whipping cream
  • 2 teaspoons almond extract
  • 1 can cherry pie filling
  • Hershey Kisses

Directions:

  1. Bake the cake in two 9 inch cake pans. Let cool.
  2. Pour the whipping cream until peaks form.
  3. Use half of the whipping cream on the bottom layer. Mix the almond extract and the pie filling. Use half of that mixture on top of the bottom layer.
  4. Top with top Cake layer. Top with remaining cream and pie filling mixture.
  5. Top with hershey kisses, shredded chocolate, or chocolate drawings of any kind.
  6. Refrgerate and serve!
    Thank you Blake for so informing me that the little mounds of whipped topping look like mounds of poo (not whinnie). Thanks Blake, thanks a lot.

Blake and his birthday buddy, Sherry Hendershot. Blake's face is so attractive. I'm not even being sarcastic...hah!


mmmm...moist, delicious, and German. So good, and so easy. my favorite part was licking the butcher knife that I used to cut it. I'm actually surprised that I didn't severely injure myself in any way.


Lemon "Flat"angue Pie Oh My!

Blake. Yes, he always is a topic of interest. See, I have a policy. I give a special treat to a person when it is their birthday. Anything of their choice, but just one dessert. But, Oh no!, Blake thinks that because he is my brother...that he deserves two desserts. So, this is the first. Lemon Flat-angue Custard Pie!
You may notice from the name that I changed it a little. My meringue had a few plumping problems. I mean, I'm a busy girl...I don't have all day to sit and wait for my egg whites to come to room temp. Who does that anyway? Well, I guess I suffered the consquences. Flatangue instead of meringue.....delightful tasteful anyway...soo I'm going to start a new trend.
Lemon Flatangue Custard Pie
Items Needed:
  • 1 small can condensed milk
  • 3 separated eggs (I used cold..a key ingredient for your "flat"angue)
  • 1/4 cup lemon juice
  • 1 9-inch pie crust (I use Pillsbury refrigerated)
  • 1 teaspoon lemon zest
  • 1/4 cup sugar
  • 1 teaspoon vanilla
  • 3 drops yellow food coloring

Directions:

  • Heat oven to 375* Poke a fork into the bottom of the pie shell before you bake it. Bake 15 minutes or until golden brown. Cool for 7-10 minutes.
  • To make the filling: separate the eggs. Put the yokes in one bowl and the whites in another. In the yoke bowl, add the condensed milk, lemon juice, and lemon zest. Mix for approximately 2-3 minutes or until slightly thickened. Put mixture into the pie shell.
  • To make the meringue, beat the egg whites until soft peaks form.
  • Beat in sugar and vanilla and continue to beat until firm peaks form. (At this point, they weren't really firm...it was kind of like liquidy cotton balls)
  • Spread the flatrangue (or pour) over the custard.
  • Bake in 375* oven until golden brown on top.
  • Let cool, refrigerate.
The custard was oh so creamy and dreamy.


The remnants. I did have to give my dad a little lesson on compliments today. See, he's not the best with them. The exact phrase that he told me after eating this was "that's really decent Lauren." Now, I'm not sure if you are with me on this, but, that just didn't cut it for me. I knew he really liked it...but this is what he uttered to me. I tried to tell him that he should take a class on compliment technique...but he really didn't appreciate that. I was just trying to help him learn!
Oh and Ps...this is the BEST flatangue pie you'll ever make, so don't be afraid to mess it up. I did....and look what happened!


Sunday, February 21, 2010

Wedding Practice Party!


My first wedding cake! This is a turning point in my cake career....and I'm loving every second. Just to make sure I was ready for this, I decided to make oober amounts of samples for the lovely couple. (Shout out to Jeff and Gwen!)


Their selection was White cake with magnolia buttercream. There guests won't know what hit them! I'm even going to share the new vanilla cake recipe that I stumbled upon. Yes, this is where you jump up and down and thank me! I'll say your welcome in advance.


Creamy Dreamy Vanilla Wedding Cake

Items Needed:
  • 1 Duncan Hines White Cake Mix
  • 4 eggs

  • 1/2 cup canola oil
  • 1/2 cup water
  • 1 small box instant vanilla pudding
  • 8 oz. sour cream
Directions:
1. Combined all above ingredients and mix on medium speed for 2 minutes. Pour into a 9*13 pan. Bake for 28 minutes or until toothpick comes out clean.
2. Once cool, top with Magnolia Icing! (Recipe in a previous post!)
3. Try not to fall off your chair. I mean...it's that good.

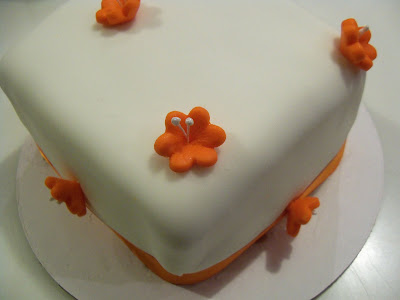
Here is a sample of the cake topper. The actual cake will be two layers with a bigger layer on the bottom that has blue ribbon and blue flowers. The top will have one large Tiger Lilly!


Cute, Cute! My bride has such good taste!

I decided that it would only be proper if I would share some cake balls with her. I made them with the leftover cake scraps and some Magnolia icing. My favorite cake ball ever. Period.


Here come the cupcake samples! There are going to be 200+ of these babys. So now, all that they need to do is choose. I'm just glad that I don't have to choose, all that I have to do is make them!! Yay!

Cutey Petuty heart designs!

A plethora of cupcake options! The cupcake at the bottom right was actually 1/2 designed by Blake, my brother. He thinks he's a fondant master now....so I'm trying to help him understand that just because he cut some fondant..he still has a lot to learn. He doesn't seem to understand. I'll just keep let him think he's a master.....I'd be stupid to convince him otherwise.

All of the lovely choices! Which one is your favorite! Cause I really don't know!

Off to the cutie couple!!

Thursday, February 18, 2010

Behold, Brownie Balls.

So, I feel as if I have just made something bad for you...worse for you. But, I think that you will disregard health when it comes to these little morsels of lovin. I can't believe I've never thought of this before.....read on if you dare to be mezmorized.
I decided to create two versions of the new bright idea. Cookies and Cream Brownie Balls and Peanut butter Brownie Balls. Both turned out ooober yummy...but I'm quite partial to the combination of peanut butter and chocolate....but that's just because I have a problem.

Peanut Butter Brownie Balls
Items Needed:
  • One Pillsbury Fudge Brownie Mix
  • oil, eggs, and water as called for on the box.
  • 30 mini peanut butter cups, unwrapped, and each cut into 4 pieces
  • Melting Chocolate, white or milk

Directions:

1. Preheat oven to 350* Grease a 9*13 pan with cooking spray.

2. Combine the mix as directed on the box. Fold in peanut butter cups. Pout into pan and bake according to the package.

3. Let cool. When still slightly warm, scoop the brownies out of the pan with a cookie dough scoop. Place on parchment paper and freeze.

4. Melt chocolate and coat the brownie balls. Top with a half of a mini peanut butter cup.

Makes about 20-25 brownie balls.!

*For the cookies and cream balls. Follow the same recipe, yet add chopped duplex cookies to the batter before baking. Once coated with chocolate, top with a part of a cookie.

For a wonderful view inside. Oh, and...there was a reason I did this...it was so I could get the other half...hehe....I thought I deserved it!


Sunday, February 14, 2010

For the Love of Magnolia

Yes. I'm finally sharing with you one of my absolute favorite things in God's good earth. Magnolia cupcakes are worth waiting in lines for hours upon hours. They are worth running 17 blocks in 40 minutes so you don't miss the bus that's coming to pick you up. (I found myself in this particular position) But, all other things aside, I got my cupcakes...and they are the cutest things I've ever seen (Because I got them a day before Valentine's Day). I have already eaten 4. hehe
This was after 45 minutes of purchasing them. Listen, you would be in the same position if you were me. I needed both flavors! Chocolate with Vanilla and Vanilla with Vanilla.

Close up. Food Porn at it's absolute finest. My favorite, Chocolate with Vanilla.


Oh baby. OOOHHH Baby. Also my favorite, Vanilla with Vanilla.

My friend Chelsea from SU. She invested in some cupcakes too. Here, she is sporting the Vanilla Cupcake with Chocolate Buttercream Icing.
For the Love of Magnolia!


Wednesday, February 10, 2010

ChickChick Parmesan Roll-Ups

Yes, I know, you are probably wondering why in the world I am baking something "un-sweet." But, it's true, I do make other things than cupcakes and candy. This, I'm very very excited to tell you about because you are going to want to jump up, dance around, and run to your kitchen to make these. I didn't even have to leave the house to make these. I had absolutely everything I needed! Even better!!

Let me just tell you, two whiny boys sitting in the other room as you are trying to make dinner is not exactly pleasant. No, not pleasant at all. After dinner, however, they said the wait was worth it. That pleased me oh so much...now if I can get them to stop complaining. (Lost cause.)

ChickChick Parmesan Roll-Ups
(yes, I do try and make each and every food I make seem like it's really cute)
Items Needed:
  • 14 chicken breast tenders ( thawed, and pounded to 1/2 inch thickness)
  • 1 (10 oz) package frozen chopped spinach, thawed
  • 4 oz. 1/3 less fat cream cheese
  • 2 cloves of garlic, finely minced
  • 1 cup shredded asiago cheese (you can you mozzerella too)
  • 1/2 cup shredded parmesan cheese, divided
  • salt, pepper, and oregano to taste
  • 1 egg
  • 1/2 sleeve ritz crackers,crushed
  • Spaghetti sauce (if desired)

Directions

1. Preheat oven to 375* and coat bottom of a 9*13 inch pan with cooking spray.

2. Combine spinach, asiago, cream cheese, 1/4 cup of the parmesan, garlic, pepper, salt, and oregano.

3. Lay out the chicken breasts and spoon mixture equally onto 14 chicken breasts.

4. Roll up chicken breasts and secure with toothpicks.

5. Place beaten egg in a shallow dish. Combine cracker crumbs and 1/4 cup parmesan cheese.

6. Dip chicken breasts in egg, then coat in crumbs. Top with pepper, salt, and oregano.

7. Place in dish and bake for 30-35 minutes or until chicken is browned on top and cooked through.

I would also like to mention that I had a slight malfunction with the microwave during this process. Well, more of a failure. It decided to stop working and there was no way to thaw my spinach. So, I improvised and decided to dunk my spinach in hot water. It was a decent idea until the water got inside the spinach and it squirted all over me. Not very pleasant. Just be happy that you weren't there. Not pretty.
Yum, gooey, oozy, deliciousness.


Monday, February 8, 2010

Super Super-Bowl Ball

The story. Yes, there is always a story for every single cake that I made/make. The reason I made this cake was, of course, because of a hopping super bowl pajama party. But, it was even more of a selfish reason than that. I, Lauren Elsasser, was hungry for cake. Really hungry. So, I made my favorite...strawberry vanilla with my magnolia bakery...mmmmmmmmm...do you blame me?

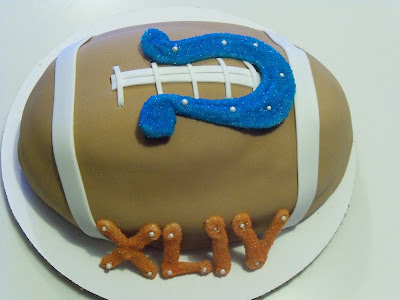
There were a few stumbling blocks along the way. First of all, I had actually made two logos. One saints and one colts. But, I soon realized that I was cheering for the colts (when the saints logo came crashing to the ground and broke into multiple pieces) so...GO COLTS. (Even thought that didn't end to well for me..oops) By the way...the colts emblem I made out of chocolate (blue-colored vanilla melting wafers). I melted the chocolate and put it into a ziploc bagged and snipped the end of. Then I "drew" a horseshoe and coated it with blue sanding sugar. Then, I attached little white edible beads to complete the logo.
Also, I kind of shooved randomn pieces of cake into a "football-ish" shape. Yes, there were a few bumps and lumps, but I tried to manage.
The fondant was died brown and all of the other little details were cut out from white fondant.
What a yummy brown glob of sugary goodness. Actually, I still have some in the refrigerator....excuse me for one moment.


Blog Template by Delicious Design Studio