Monday, January 25, 2010

Sweety Baked Potatey Chips

Well, I've always had a desire to make my own potato chips. I mean, how fun is that! Well, it makes me happy anyway. Plus, baking your own potato chips is an excellent way to keep the healthier...plus if you have a few hours to kill...or if you are stranded in your house with a potato and an oven...or if you are too cheap to pay for a 25 cent bag of potato chips. These are all excellent reasons why you would want to make these little circles of delight.

So, go on now.

Sweety Baked Potatey Chips
Items Needed:
One large Russet Baking Potato
One large Yam (aka Sweet Potato)
Olive Oil
Parmesan Cheese
Oregano
Black Pepper
Garlic Salt
Brown Sugar
Directions
1. Wash and peel the potatoes. Slice in very thin with a knife or a mandoline slicer. (Be careful, I almost cut one of my fingers off.)
2. Grease two cookie sheets with Pam spray. Place slices on sheets, not overlapping each other.
3. Sprinkle with olive oil, covering fully.
4. Top Russet potatoes with oregano, black pepper, parmesan cheese, and garlic salt.
5. Top Sweet potatoes with brown sugar.
6. Bake in a 375* oven for 20-30 minutes, or until crispy.
* Be careful with the olive oil. I had a little bit of an incident. I kind of didn't put a cookie sheet under the pans to prevent the oil from falling to the bottom of the oven. So...after a few minutes..olive oil was burning and smoke was spewing out of the oven! Blake (my brother) got so upset at the sound of the fire alarm, that he came into the kitchen and just ripped it off the wall. Yikes....so I'll remember now for next time.


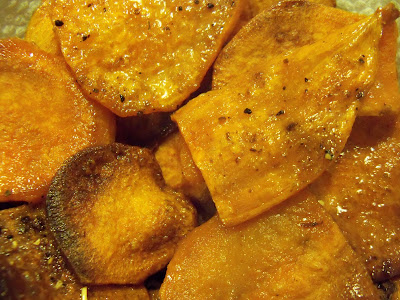
The parmesan cheese on these puppies made them soooo tasty. Mix and match with your favorite flavors! They are easily adaptable.
Yam Chips! Doesn't that sound delicious. Well, these were my absolute favorite! The brown sugar made them taste like candy. I think I ate half of the batch! Oh man!


Sunday, January 24, 2010

Almost Great Grandma's PB Butterscotch Bars

The plateau of butterscotch and peanut butter up there, yeah...well...let me tell you a small story. Ever since I can remember, my dad would make these peanut butter butterscotch treats for us. (Yes...my dad!...amazing that he actually made something..don't worry this was the only thing that he made..other than grilled cheese sandwiches haha) Anyway, we looved these, and he loved them because his grandma ALWAYS would make them for him.

Some time ago, the recipe disappeared and dad couldn't remember what had gone into them. So, I felt that it was my duty to "recreate" it. This meant alot to him. And try after try, dad would voice that they "just weren't the same"

Well friends, I finally got it...and it's ober simpler that I had originally thought. I finally got the sign of approval from the one that mattered...dad. I was jubilant.

Great Grandma's PB Butterscotch Bars
Items Needed:
6 cups Kellogs Rice Krispies Cereal
1 cup creamy peanut butter
1 bag butterscotch morsels
Mini marshmallows (for decoration)..actually because I had 22 random marshmallows that needed a home...thats the only reason I put them on there.
Directions:
1. Butter a 9*13 pan, set aside.
2. In large bowl, add the rice krispies. Set aside.
3. Melt the peanut butter and the buttersotch morsels in a microwave safe bowl for one minute, stir until melted thoroughly.
4. Add the peanut butter mixture to the rice krispies until completely covered.
5. Pat into buttered pan with the back of a buttered spoon.
6. Refrigerate until firm, cut into squares, and serve. Store refrigerated.


Chili's Perfect Mate

More food porn. I really sound dirty saying that...but...it's kind of what it is.


So, as the chili was cooking away...I realized something. Chili has a girlfriend. Her name is cornbread. So, I decided that the oven was calling me once more...not a surprise. But, I had a box. Yes, a boxed mix. I felt like a poser. But, I decided I would doctor it up just so I felt better about myself.


Sour Cream (Chili's Girlfriend) Corn Bread
Items Needed:
One Marie Callender's Corn Bread Mix
1 3/4 cup water
1/2 cup sour cream
Directions:
1. Preheat oven to 375* Grease a 9*9 pan.
2. Combine mix and water. Fold in sour cream.
3. Bake for 25 minutes or until light golden brown.
4. Serve with honey butter! (Recipe to follow!)
mmmm....fresh out of the oven.

Honey Butter-actually if you don't have lots of free time to focus on making this, you might as well just over look this....it's very tedious and tiring.
Items Needed:
1/4 cup softened butter
1/4 cup honey
Directions:
1. Mix honey and butter.
2. Wipe the sweat that you have produced while laboring over this.
3. Enjoy the fruits of your work.


Saturday, January 23, 2010

Mini Cheesecake Fruit Tartlets

These make me quite happy. Personalized mini fruit tarts! I love it. These are definitely giftable for my surgical friend. They worked, and needless to say, I have accomplished my duty.

Mini Cheesecake Fruit Tartlets
Items Needed:
One Pillsbury refrigerated sugar cookie roll
One Instant Cheesecake Jello Brand pudding mix
1 3/4 cup milk
4 oz Philadelphia Cream Cheese
1 cup Cool Whip
Assorted Fresh Fruit (strawberries, blueberries, and kiwi, etc.)
Directions
1. Preheat the oven to 350* Grease mini tart pans with Pam. Also, you can make these as large circle cut-out cookies and make them as normal if you don't have the tart pans.
2. Cut the cookie-dough from the log in about 1-inch portions and push into pans as pictures.
3. Bake for 10-12 minutes or until light golden brown. Let cool for 5 minutes and remove from pan onto rack to cool.
4. While baking, prepare fruit and topping. To make topping, Whisk the pudding into the milk for two minutes. Mix in softened cream cheese. Fold in cool whip. Top the tarts. Lick the spoon. Refrigerate.
Personalize with chocolate drawings! Be creative! PS. I saved one of these just for me...again..this can be between you and I.


Sour Cream Raspberry Coffee Cake (Coffee not Included)

So, I recently recieved a wonderful excuse to bake! (I really like those times if you haven't noticed). Surgery. Surgery is an ecellent reason to bake! It makes everything feel a WHOLE lot better. So I asked the surery-ee what he wanted and he requested something I have never made before. I know...me...never make something? It astounded me too. But, don't worry, I got it covered.

So, I had to make something new, which is equally as exciting. A home-ade recipe! Treasure it, print it out, carry it with you, whatever you need to do to keep it forever! These don't come around that often.

Raspberry Sour Cream Coffee Cake
Items Needed:
1 Aunt Jemima Easy Mix Coffee Cake (I know I know...just stay with me)
2/3 cup light sour cream
1 egg
1/2 cup milk
dash of cinamon
1/2 to 3/4 cup of Solo brand Raspberry Cake and Pastry Filling
Directions:
1. Preheat oven to 375* Grease an 8-inch cake pan.
2. Take the coffee cake mix, egg, cinamon and milk. Mix until combined. Fold in the sour cream.
3. Dollop the raspberry filling onto the batter in the pan. Swirl with knife until incorporated into the batter.
4. Top the batter with the enclosed crumb topping packet from the coffee cake package.
5. Bake for 30 minutes or until cake is golden brown.
6. Let cool, cut into 8 "pie" slices.


Let me tell you a story about this "bag." The box directions stated that you were supposed to add all of the ingredients into the bag and "squish" it together. Really? Coffee cake in a bag? What is this world coming to?

We aren't going to talk about that little teeny tiny piece missing. Ok, I give in...it was me! I did it! I couldn't help it! Don't tell the surgery-ee....he'll never have to know. This can be between you and me.
A dusting of powdered sugar, and it was dusted to perfection. Powdered sugar ads sweetness to everything.
So, I have to say it. This is food porn at it's finest. I mean...that makes me want to eat my screen off my laptop. I can't look at it long. It starts making me go crazy.


Thursday, January 21, 2010

Chocolate "Wild" Animal Bars!

For the love of animal crackers.....and chocolate....and peanut butter; I felt something needed to be done. Why are animal crackers not incorporated into more of our every day life. It's a sad sad thing actually. So, I changed that. I decided that it was necessary for something to happen.

Actually, the real story is this. I wanted to make rasperry coffee cake for a friend. But, something happened. I forgot to get milk. So...no coffee cake. Then, I had a mini panic attack and searched frantically for something that I could throw together. These were the things I had found. Butter, Chocolate Cake Mix, Peanut Butter Chips, Eggs, and Animal Crackers. Hmmmm... Well...here's what happened. PS I kind of have and obsession with the mixture of chocolate and peanut butter (if you haven't been able to tell by now.)

Chocolate "Wild" Animal Bars
Items Needed:
3 cups (or so) of animal crackers
& 6 Tablespoons of melted butter
One chocolate cake Mix
1 cup peanut butter morsels
1/4 cup butter
2 eggs
1/4 cup water
1/4 cup brown sugar
Directions:
1. Take the animal crackers, and beat the living daylights out of them. I'm actually being serious here. I think this was my favorite part of the whole process.
2. Melt the butter and add to the animal cracker crumbs. Press into a 9*13 pan and bake at 375* for approximately 8-10 minutes or until light golden brown. Let cool.
3. Meanwhile, combine the cake mix, butter, eggs, water, and brown sugar with a mixer until combined.
4. Pour the peanut butter chips over top of the animal cracker crust. Top with chocolate dough mxture. It is very hard to spread, so just dollop it everywhere in small increments.
5. Bake for approximately 25-35 minutes or until you jiggle it and it doesn't move. Test it with a toothpick..it will not be completely clean because of the peanut butter chips melting.
6. Let cool, cut into squares, flip over to expose the animal cracker side up, and serve!
The finished brownies! Now all I have to do is flip those babies over!

mmmmm...chocolatey...peanut buttery...and animal crackery. Does it get any better than this?
Unleash your "wild" side!


Saturday, January 16, 2010

Wonderful World of Disney (Lauren Style)

Who would have thought? A magical world of sugar and delight. It seemed as if it had been made all for me. Let me just clear this up...I LOVED IT. As you can see in these little blurbs from my walk in Downtown Disney.


Yes, that is a giant castle made out of candy, and yes, I am hugging it. (I planned to never let go, but...my brother didn't like that idea as much as I did.
My cupcake and cookie I purchased.....it was from here. As you can see in the top left hand corn was how my beautiful pink cupcake was supposed to look when I opened it up later that night...but...as you know...it didn't happen that way.

It just keeps getting better! That is a Mickey Mouse made out of rice krispy treats...ahhh!! And....for 45.95 it can be yours too!


The haven of all my joy and delight was found in this 6 foot high jelly bean "painting." I love these people.


If only candy was actually that size in real life....a girl can dream can't she?

I thought this was necessary.


A stop a Goofy's candy store unfortunately got me hooked on the cute Minnie Mouse baking section. Do you see that? A cupcake kit with Minnie on it! Hallelujah! I mean...I had to buy it...it wasn't really an option!


Disney Cookies and "What's in that Box?"

So, of course as I was in the lovely shop of all things Lauren, I had to try a piece of Disney's Culinary Wonderfulness. I really thought that since Disney was a place where dreams come true, I thought the treats would be equally as wonderful.
My first purchase? A peanut butter chocolate chunk cookie. It looked so chewy, delightful, and amazing. Almost so good that I couldn't eat it. But.....
My first bite, and mhhhmmmm soo good. I probably would have eaten the whole thing, but I had to try some other treats and plus it was 12:30 in the morning. Not the best of ideas.

Next, I purchased the mother of all wonderful Disney treats. It even came with this delightful Disney box. What could it be? Let me give you a hint, I dream about them.
Of course, a delightful yellow cupcake with pink buttercream frosting. The sad and unfortunate part about this cupcake is that it was beautiful. The frosting was beautifully piped into a spiral. Then, it happened. I dropped the box, the cupcake turned over, and yes....I had to lick the smudged frosting off of the bottom of the box. Don't fret though, it wasn't that big of a problem.

My two bites of the fabulash little morsel of fantasticness. I got over the fact that I dropped it quite quick. Did I mention the amazing little sprinkles that were shaped like mickey? WHERE DO I GET THOSE!?


Disney is proving to be a fabulous place for me. I think I might go finish of that cupcake.

Friday, January 15, 2010

Trip to Tu Tu Tango

So, after the peach crisp, and cleaning up Blake's apartment, I figured that since there was NOTHING in the pantry and his kitchen was already clean....it would be best if I did not bake anything today. It's tough. Real tough. But....

Well, I'm a sucker for a good/different restaurant. Actually, that would probably be one of my dream jobs. (restaurant critic) But, this restaurant was truly different. Cafe Tu Tu Tango, located on International Drive, is probably the most unique restaurant that I've ever been too. The restaurant is a "small plate" restaurant. This means that all of the menu items are appetizer sized. You order 2-3 per person, and share. The appetizers come out at all different times, so you can share them.

Another cool thing about this place is that there are artists painting while you eat. All of the dcorations/paintings/sculptures are for sale. I rate this a 10 out of 10 for unique, entertaining, and amaaazzing food!


My first course. Roasted Pears on Pecan Crisps/Arugula/Gorgonzola/Balsamic Glaze. Let me sum this course up for you. The best thing I've ever eated. Wow...that was simple.
My second course. Cajun Chicken Egg Rolls/Roasted Corn/Cheddar and Goat Cheese/Creole Mustard Dipping Sauce....Summing this up...also the best thing I've ever eated. Amazing!

Visit this website for pictures of the inside of the restaurant and the exciting menu!

Thursday, January 14, 2010

Easy Peachy Crisp

Yes, I must give the background to this peachy wonder. I'm visiting my brother in Orlando. I tried to make him understand that I have a compulsive baking bug, so I made him his faaavoorite thing. But, that is not all. About one month ago Blake, himself, attempted to make peach crisp without contact me or asking for my guidance. Lets just say, after 90 minutes in the oven, and a pan that will be stained forever...it didn't work out. So in the midst of cleaning his apartment (and by cleaning I mean stripping, throwing away, and wiping down absolutely everything in sight) I made him his peach crisp. Surprisingly...he said it was sooo much better than his......hmmmmm.....do you wonder?
So, in other words....he absolutely loved it....and....this wasn't his only serving!
Easy Peachy Crisp
Items Needed:
One yellow Cake Mix
One large can of slices peaches
one small can of sliced peaches
1/2 cup of butter + 2 Tbs.
cinnamon and sugar (as desired)
Directions:
1. Drain cans of peaches (reserve 2-3 Tbs. liquid) and place into greased baking pan. I used a pan a little smaller than a 9*13, but you can use whatever you would like.
2. Pour cake mix ontop of peaches in pan.
3. Melt 1/2 cup butter in microwave. Pour over cake mix. If there are any spots of cake mix that appear to not be covered. Place little dabs of butter on top of those spots.
4. Sprinkle cinamon and sugar on top of the butter.
5. Bake 50-60 minutes until or until golden brown. Serve warm with vanilla ice cream.


Chocolate Peanut Butter Blowout Brownies

So, another birthday! Yay! I love birthdays! Not only because birthdays are happy and fun...but because I get just one more excuse to bake! Woo! This time, it was a friend from church. But, I really didn't feel like leaving my home, so I thought this was my opportune time to create a recipe...so off to work I went....and this is what I came up with. Probably my new favorite chocolate peanut butter creation. Well, you will just have to try it and let me know what you think.
Chocolate Peanut-Butter Blowout Brownies
Items Needed:
One Chocolate Brownie Mix (3 eggs, oil, and water called for on the box)
3/4 cup of peanut butter chips
1 cup creamy peanut butter
1 1/2 cups powdered sugar
1/4 cup brown sugar
1/2 cup butter, softened
20 Reese's miniatures,chopped
white and milk chocolate
Directions
1. Combine the brownie mix, oil, eggs, and Reese's chips and pour into greased 9*13 pan.
2. Bake according to package. Let cool. Meanwhile, combine peanut butter, powdered sugar, brown sugar, butter, and chopped Reese's. Spread over cooled brownies.
3. Freeze brownies for approximately 15-20 minutes.
4. Cut with heart shaped cookie cutter or cut into squares.
5. Drizzle melted white and milk chocolate over brownies. Let cool, store in covered container.
The cooled brownie base....I could just eat this! Oh wait, I did. oops.

Yum Yum, layer after layer it gets better. Here the Heart brownies are topped with the delightful peanutty topping. (I also sampled these!)
Finally, the finished product! Don't worry, I tried them to make sure that they were tasty enough to give as a gift! Yes...they were just fine! Is it bad that i saved two for me. Shhhh...don't tell.


Monday, January 11, 2010

Cannoli Craze

Yay! New and exciting news! I had my second "Miss Cupcake Call!" This time, however, it was something I had NEVER tried. So, naturally, I was completely and ridiculously excited. I had a free day, and off to work was I!

The call was for chocolate chip cannoli. What? Cannoli? That Italian creamy and delicious crunchy log with chocolate. Ok! I'm game. I was even given the recipe, so all that I had to do was make it! Even better! The work was practically done for me! So, I messed up quite a few cannoli shells in my quest for this new and exciting treat, but I'll include all the messy details!

"Lightened Up" Canolis

Items Needed:

Ricotta Filling:

8 cups part-skim ricotta cheese (1-32 ounce containers)
2/3 cup granulated sugar
1/2 teaspoon of vanilla extract
6 ounces 1/3 less fat cream cheese
6 ounces finely chopped semi-sweet chocolate

Shells:

Cooking Spray
1/3 cup granulated sugar and 1/2 teaspoon cinnamon combined
One package frozen phyllo dough, thawed
4 tablespoons butter, melted

1. To make the filling, combine sugar, cream cheese, vanilla extract, and ricotta in mixer on medium until combined. Fold in chocolate and refrigerate. (enough for 12 shells)
2. To make shells, preheat oven to 375* F. Take pieces of aluminum foil and roll up (using your finger as a guide). Make sure that you don't roll them very tight or you will not be able to get them out of the shell after they are done. Next, coat the rolls with cooking spray.
3. Lay out the phyllo dough. Take one sheet of dough and brush melted butter and sprinkle with cinamon sugar. Repeat with one more layer. Cut into four equal parts, and roll up onto aluminum Rolls. Repeat with remaining rolls. Spray with cookin spray.
4. Bake for 12-14 minutes or until golden brown. Take out of the oven and sprinkle with cinamon sugar. Transfer to wire rack to cool. Remove foil by twisting the ends in opposite directions and pull out foil.
5. Place filling in pastry bag and fill each cannoli with the ricotta filling. Place chocolate chips on either end, and sprinkle with cocoa powder and powdered sugar. Serve Immediately because the shells will get soggy after awhile. I sent the shells and the filling separate, and it can be filled when necessary.

These were my very first cannoli aluminum rolls. Two words for you. Didn't work. I rolled them to tightly and the end result...they all fell apart and broke and shattered into little pieces. Make the rolls bigger I say!

The rolls that turned out! I was rather excited after the first batch failed miserably. It all worked out, so don't be afraid to try!

MMMMHMMMM. I actually loved these. I'm not one for cannolis but these were tasty. Plus, the fact that they were lighter made me feel a little better about myself.

Here are a few of the precious little morsels, all ready for their reciever! She loved them and hopefully all the people she shares them with will think the same. In the meantime, I think I'll go eat some of those broken shell ;).....why do you think I broke so many? haha
 
Blog Template by Delicious Design Studio